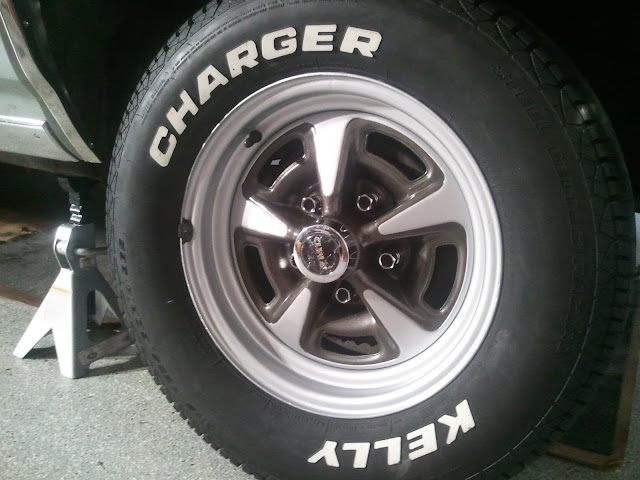
Nothing can ruin the presentation of your restoration more than a scratched, stained, faded and dirty set of wheels. This is the challenge that I was recently faced with for my 68 GTO. I wanted to show the car more but was a bit embarrassed by the appearance of the original wheels. My wheels were greased stained on the inside, so much so that they looked black. On the outside, each wheel also showed signs of multiple lost battles with the curb. The paint was faded and lacking luster.
Before
After
Beginning in 1967, the Rally II wheels were introduced as an option for the Pontiac GTO. The wheels have a spoked look, with a 2-tone finish of charcoal gray and silver.
The bumper for my 68 GTO is finally out to get re-plated. This is a before pic. The bumper in this pic looks pretty good but up close, it doesn't as nice as it should in contrast to the new body paint.
I chose Verne's Chrome Plating in Gardena, CA. Vern's has done chrome plating since the 1960s. They specilize in "show-quality" chrome and came recommended from my cousin who restores cars. Verne's use a triple chrome plating process, that consists of a copper base, nickel plating and then a hexavalent chrome finish. The latter uses chromates, which are not as eco-friendly, but actually provide a better, more corrosive resistant finish than the trivalent alternative. Need an eco-friendly bumper finish? Forgetaboutit. This is America and nothing says America like chrome bumpers on a classic car, so don't skimp!
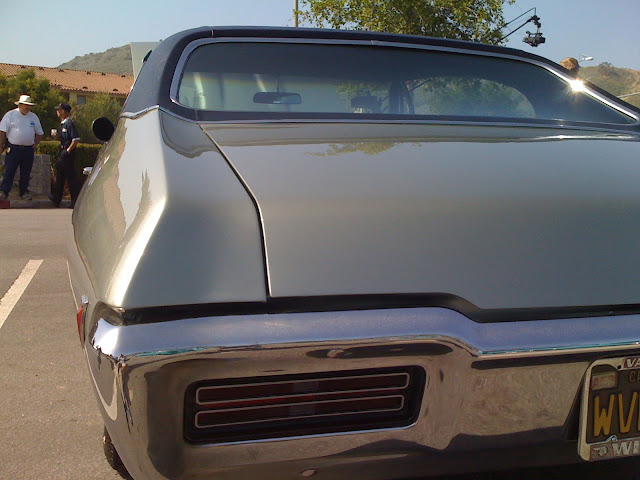
After about 8 weeks, my 1968 Springmist Green Pontiac GTO is back home! The paint and body work is complete and looking good. The vinyl and molding are all set. What's left to do is the interior and a bunch of little things (like put the door handles back on - details.
So my wife followed me home tonight because it was dark, I had a gallon of gas in the tank and no tail lights. Had a bit of a scare after leaving the gas station and almost rear ended a car before making a left onto LA Ave. Seems that the brakes need a little maintenance. Nearly crapped myself.
This is very exciting. Today I stopped by the shop to visit the car and drop off the molding trim for the vinyl top. I got to take a look at the car. It's beautiful! Painting is complete. Next steps are to buff it out and reinstall the bumper and valance.
I stoped by the body shop the other day to take a look at the progress. Seems that it's a bit challenging to properly align the front bumper. The goat has the endura bumper option, which is a flexible polyurethane outer coating over the steel framing. This one is original, so it is most likely misshaped from years of bumping into stuff. They're not going to be able to get the sides of the bumper aligned with the front fenders, but this is OK. The middle is aligned with the hood at least.
I also found a site that listed the Rinshed-Mason and Ditzler codes, http://www.myss396.com/ChevelleInfo/PaintCodes/1968_PaintCodes.html, where the code formulas for the color was verified from paint chip scans. Seafrost Green is Chevy's version of Pontiac's Springmist Green color.
It's really official now. I've finally done it. This afternoon I dropped off the goat at the shop where the body and paint is going to be done, Auto Body Unlimited in Simi Valley, CA. She's gonna come back with a new look: straight body, fresh paint. Then the fun work is left for me - reassembly of all the components that attach to the body, like the door handles, trim, emblems.
Paint is going to be the original Springmist Green. The vinyl top is going to be replaced and will be black.
I sort of can't believe this is happening. I've owned this car for years and it's just sat in the same condition forever. Well, guess I kept it for a reason, so let's go!
Well, this is it. After 15 years, I'm finally committing to restoring the goat. I believe I have my finances lined up. This is pretty exciting for me. I've wanted to do this for years. Starting today, I'm looking for the right paint and body place to do the work I don't trust myself doing - straightened, filling, priming and painting the body. I'm also going to keep the vinyl top and I'm fairly certain I'm going to go with the original body color of Springmist Green. The car is 99% original, might as well keep it looking that way.
So this is it. Photos and videos are forthcoming. As promised, this will be documented!
I don't "blog". I "micro" blog using Twitter now. However, some things are worth talking about in more than 250 character increments. My 68 goat is one of them. Hopefully this is one of many future blog posts on the car. If not, it means that I'm doing anything to the car. And that would suck.
So, does this say something about how often I drive the GTO? I went out and got a battery charger at Harbor Freight cause the "new" battery that I bought for the goat was dead (ok, it wasn't new but it wasn't "used" either). Car wouldn't start. So sad. A few hours later, the battery was fully charged and the car started right up.
So I took the car for a little spin afterwards and remembered one reason why I don't drive it - carbon monoxide poisoning. Exhaust fumes are somehow leaking into the cabin while driving. I think this is because I don't have any weather stripping. I'm going to blame it on an exhaust leak and use that as an excuse to get new headers and full exhaust. Thinking Flowmaster with single chambers.
Meanwhile, I must admit that my other passion has taken over... my new toy.... a 2006 Lotus Exige. But that's a topic for another blog post (like my first